
|
|
|
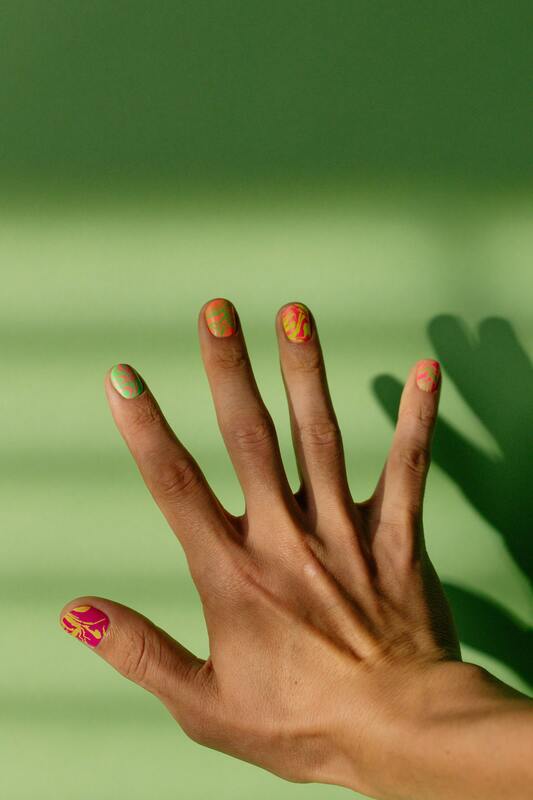
Nail art stickers are basically sticky decorations for your fingernails and toenails. They let you get fancy designs without needing to paint or draw anything. They come in all sorts of shapes, sizes, textures, and colors—from simple little things to 3D stuff and wraps that cover your whole nail.
🔍 Sticker Types
* Plain stickers: Just peel and stick. Easy!
* Lace/stripe/vinyl things: Thin strips or guides to help with other designs.
* Water things: Soak, then slide onto nails. Good for detailed designs.
* Shiny stickers: Flashy and reflective.
* See-through stickers: Add a little something over your polish color.
* 3D stickers: Have gems or bumpy stuff for a cool look.
* Gel wraps: Need a UV/LED light to stick; kind of like getting your nails professionally done.
🧰 How to Put Them On
* Get your nails ready
* Take off old polish and any oils. Make sure your nails are dry.
* Push back your cuticles and buff nails a bit.
* Pick the right size
* Grab stickers that fit your nail width.
* Cut off extra if you need to.
* Stick it
* Use tweezers so you don't touch the sticky part.
* Start at the base of your nail and smooth it out to get rid of any air bubbles.
* Finishing touches
* File off the extra sticker by filing DOWNWARD.
* Add a clear top coat to help them last and make them shiny.
* Keep your hands out of water for a bit.
🧹 How to Take Them Off
* If a corner is loose, gently peel it off.
* If they're stuck, soak them in acetone or warm, soapy water.
* Be careful, so you don't hurt your nail.
👍 Good Stuff & 👎 Not-So-Good Stuff
* Good:
* Quick, easy, and cheap.
* Tons of design options.
* Don't need to be an artist to get cool designs.
* Not so good:
* They might peel off if you don't put them on right.
* Some 3D ones can get caught on things.
* Don't last as long as professional manicures.
🛑 Watch Out For
* Using stickers that are too big.
* Putting them on oily or wet nails.
* Leaving in air bubbles.
* Not using a top coat.
* Filing UP instead of DOWN when you trim them.
🎨 Design Ideas
* Use see-through stickers over colored polish for a subtle look.
* Go bold with full nail stickers.
* Just use stickers on a couple of nails to make those pop.
* Mix different textures for something unique.
* Change designs with the seasons or for holidays.
📝 Make Them Last
* Always clean your nails first.
* Seal the edges with a top coat.
* Don't soak your hands right after putting them on.
* Trim carefully to match the shape of your nail.
* Keep stickers in a cool, dry place to keep them sticky.
**Nail Sticker Cheatsheet**
1. **Peel-and-Stick Stickers:**
* What They Are: Basically, they're printed designs on sticky sheets. Just peel 'em off and slap 'em on your nails.
* What They Look Like: Think simple stuff – flowers, stripes, cartoons, or just random shapes.
* How to Use Them: Super quick and easy, which makes them perfect if you're just starting out.
* Pro Tip: Make sure your nails are clean and dry first.
2. **Water Transfer Decals:**
* What They Are: These are thin designs printed on paper that dissolves in water. You soak them, slide the design onto your nail, and pat it dry.
* What They Look Like: You can get some really detailed looks with these, like lace, flowers, or geometric patterns. Stuff that's hard to paint yourself.
* How to Use Them: They give you a delicate, detailed finish.
* Pro Tip: Be careful with them, and seal them with a top coat.
3. **Lace / Stripe / Vinyl Stickers:**
* What They Are: Thin strips or shapes that you can use as stencils or just to help you make cool designs.
* What They Look Like: Lines, zig-zags, grids, or even lace patterns.
* How to Use Them: Awesome for geometric or simple designs.
* Pro Tip: Put them on carefully so you don't get air bubbles. You can put them over your nail polish, too.
4. **Foil / Metallic / Holographic Stickers:**
* What They Are: Stickers that are all shiny and reflective. They can look like chrome, metal, or even rainbow-y.
* What They Look Like: Bold and kind of futuristic, or just super glam.
* How to Use Them: They're great if you want your nails to really stand out, or you can just use them on one nail as an accent.
* Pro Tip: Put them on top of a dark color to make them even shinier.
5. **Transparent / Clear Stickers:**
* What They Are: Designs printed on clear plastic. So you only see the design, not the background.
* What They Look Like: They give your nails a subtle, layered look, like the design is floating.
* How to Use Them: You can use them over any nail polish color.
* Pro Tip: They work great with both gel and regular polish.
6. **3D Stickers:**
* What They Are: These are raised stickers with stuff like gems, pearls, flowers, bows, or bumpy patterns.
* What They Look Like: They're dimensional and catch the eye.
* How to Use Them: Perfect for making a single nail stand out, or for wearing on special days.
* Pro Tip: Use a strong top coat or nail glue to keep them on tight.
7. **Semi-Cured / Gel Stickers:**
* What They Are: Flexible gel stickers that you have to cure with a UV/LED light. They're like gel wraps.
* What They Look Like: They give you a smooth, shiny, professional look.
* How to Use Them: Last longer and are tougher than regular stickers.
* Pro Tip: You need a UV/LED lamp to make them stick and look good.